Windows Server Codename “Longhorn” – DHCPv4 Installation
In this post, I will show how to configure the DHCPv4 role on a Windows Server codename “Longhorn” server.
I have done this on the same server SRO-LH-01, which is already a domain controller for the sro-lh.local domain.
Basically, it comes down to adding a new role to the server:
I chose the “DHCP Server” role (notice that the left pane was dynamically updated to reflect the role(s) marked as to be installed):
A short introduction text on DHCP:
Then I had to chose the binding to use. The wizard shows the list of NICs having a static IP address. I chose the NIC of the server:
The next step is to provide the DNS domain and the IP addresses of the DNS server (this will be found back in the DHCP Server Options). As there is only one DNS server in my test environment, the alternate DNS server IP address is left empty:
No WINS is required:
The next step is to add or edit DHCP scopes:
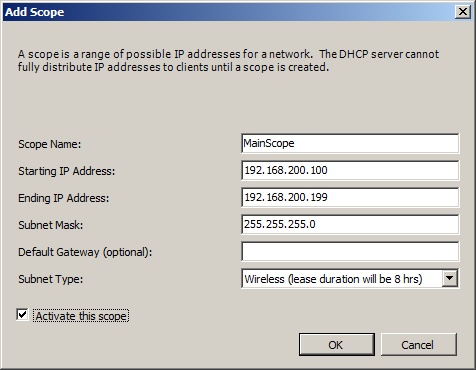
I added the “MainScope” scope for my tests. It will use addresses in the 192.168.200.[100-199] range. Initially, I also chose a shorter lease duration:
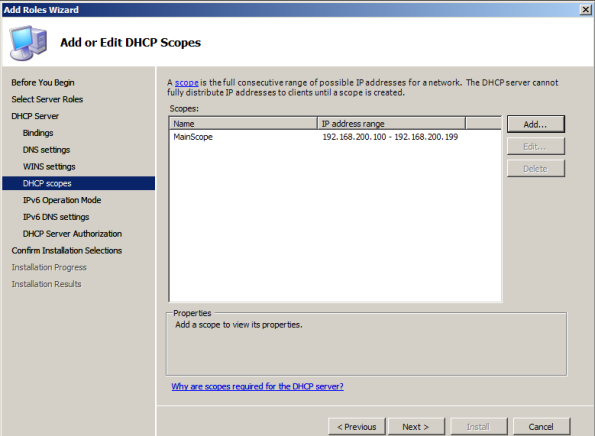
This is how it looked after clicking OK:
As I was not interested in IPv6, I said no to the next question:
The last step in the configuration wizard is to authorize the DHCP server in Directory Services:
Ultimately, the wizard shows a summary of the configuration before actually installing it:
Progress status:
Well, that’s it… DHCP is installed and configured.
I made a test: I booted my XP VM SRO-XP-01. The test was successful, as the PC received an IP address from the “Longhorn” DHCP server.
I had a look at the DHCP console and SRO-LH-01 and could see the lease from SRO-XP-01:
So, all fine ;).
Steve


Leave a comment